Playing board games is a great way to bond with family and friends. Whatever your hobbies and curiosities are, there’s bound to be a board game out there that will strike your interest! Now, most of the board games I’ve played often involve dice, and we all know how competitive these types of games can get. Lots of accusations flying around, sneaky players trying to control their rolls.
Tutto sarebbe bello se ci fosse qualcosa da fare per fermare il bagno di sangue prima che accada. E per fortuna c'è.

A dice tower is a simple machine that can guarantee you and other players fair rolls at every turn. And while you can certainly buy one from any gaming store in the U.S., there’s just something more enjoyable and fun about designing a dice tower of your own!
So, that’s what I’ll be teaching you today in this step-by-step guide on how to make your own dice tower!
But before we get started with building, let’s go over some of the basics.
Table of Contents
Che cos'è una torre di dadi e come funziona?
Not everyone uses a dice tower during a game. So, if you don’t already know what a dice tower is, let me explain.
During a game, there are several ways a player can cheat a roll. The most common way he can do it is by sliding or dropping his dice so that only his desired numbers appear, giving him an unfair advantage during the game. These are called “controlled throws.”
Una torre dei dadi è un dispositivo meccanico che rende impossibile per un giocatore controllare i propri lanci. In genere ha 2 sezioni: la sezione verticale (il tubo) e la sezione orizzontale (il vassoio di atterraggio).
The vertical section or “the tube” has an opening at the top where the dice is meant to be dropped into. Inside this section, baffles are installed to parry the dice, knocking them around as they fall. These baffles guarantee that players get different results after every roll.
In fondo alla sezione verticale, l'ultimo deflettore spinge i dadi sulla sezione orizzontale: il vassoio di atterraggio.
The landing tray, as its name suggests, is basically where the dice “lands” after they fall through the tube, and is where results are displayed for players to see. This section is flat and often constructed with high sides to prevent the dice from falling out.
Cose da considerare prima di costruire una torre di dadi
Come per tutte le invenzioni, anche per la costruzione della torre dei dadi è necessario considerare un paio di fattori, tra cui:
- The number of dice you’re going to use (in other words, the overall size of your dice tower)
- Collassabilità o ripiegabilità
- Il tipo di materiali che si desidera utilizzare durante la costruzione
1. Numero di dadi
Most board games require the use of one or two dice at a time, so a standard-size dice tower will do you well in this scenario. But if you’re planning to play a game that needs players to use 3 or 4 dice for each throw, you’re going to need a much larger dice tower in-game. This is to ensure that all the dice fall and land consistently without getting stuck between baffles (which can be really annoying during a game).

2. Collassabilità o pieghevolezza
The next thing you’ll want to think about is storage. Leaving your dice tower on a shelf or table or some random place in your house will make it accumulate dust, and that can be really tricky to clean later on. The normal static L-shaped dice towers you see online might not be the best choice if you’re looking for something that is easy to store and/or portable. To avoid this problem, make sure to choose a plan for a collapsible or foldable dice tower and assigning a designated storage area is essential.

3. Tipo di materiali
You can build dice towers out of basically any material from fiberglass to cardboard, but the most common ones you’ll see are often made of wood or foam board.
Questi due materiali sono ottimi per le torri di dadi per due motivi principali:
- They’re both light-weight but durable materials
- Assorbono le vibrazioni e possono ridurre al minimo il rumore dei dadi che rotolano.
Alcune torri di dadi utilizzano rivestimenti o cuscinetti in feltro per una migliore riduzione del rumore. Personalmente sono d'accordo con questa scelta. Spesso, quando si gioca a giochi da tavolo di lunga durata, il rumore che proviene dai dadi che cadono può diventare inquietante e può facilmente interrompere la concentrazione.
Per una migliore esperienza di gioco complessiva, vi consiglio di utilizzare una sorta di imbottitura per la vostra torre dei dadi.
Come realizzare la Torre dei dadi?
Now that we’ve covered pretty much everything there is to know about dice towers and what factors to consider before building one, we can now proceed to do what you came here to do: build your own dice tower.
Let’s jump right into it!
Come realizzare una torre di dadi in legno
Le torri di dadi in legno sono robuste e sono ideali per chi ama giocare con gli attrezzi.

Fase 1: raccogliere gli strumenti e i materiali
Let’s start by gathering all the tools and materials you need for constructing your dice tower.
Questi sono:
Strumenti:
- Morsetti
- Metro a nastro
- Matita
- Carta vetrata
- Scalpello
- Sega a mano
Strumenti opzionali:
- Pialla
- Sega da tavolo
Materiali:
- Compensato di buona qualità di circa 6-8 pollici
- Colla per legno
- Supercolla
Materiali opzionali:
- Feltro o qualsiasi altro tipo di imbottitura a scelta
Once you’ve gathered all your materials, you can move on to the next step.

Fase 2: ottenere le dimensioni giuste
If you stuck by the considerations I listed in the previous section, then you probably already have a rough idea of how big or small you want your dice tower to be. However, if you skipped that section and have no idea what I’m talking about, then I suggest you go back and read it before you proceed.
Getting your dice tower dimensions right is possibly the most important part in this construction process because if you get this wrong, your dice tower won’t work the way it’s supposed to.
Le dimensioni standard delle torri di dadi sono spesso 6,5 x 3 x 4, ma è possibile creare misure personalizzate in base alle proprie esigenze.
For the tube (the horizontal section), you’ll need to measure:
- Un pezzo di legno da 5,5 x 4 per il lato anteriore del tubo.
- Un pezzo di legno da 6,5 x 4 per il lato posteriore del tubo.
- Due pezzi di legno 6,5 x 3 per i fianchi
- Tre pezzi di legno più piccoli da utilizzare per i deflettori
For the landing tray (the horizontal section), you’ll need:
- One 4.5 – 5” wide piece of wood for your tray (the length you can adjust depending on your needs)
- Quattro pezzi di legno più piccoli da usare come barriere per il vassoio
After you get your measurements down, it’s time to do some cutting.

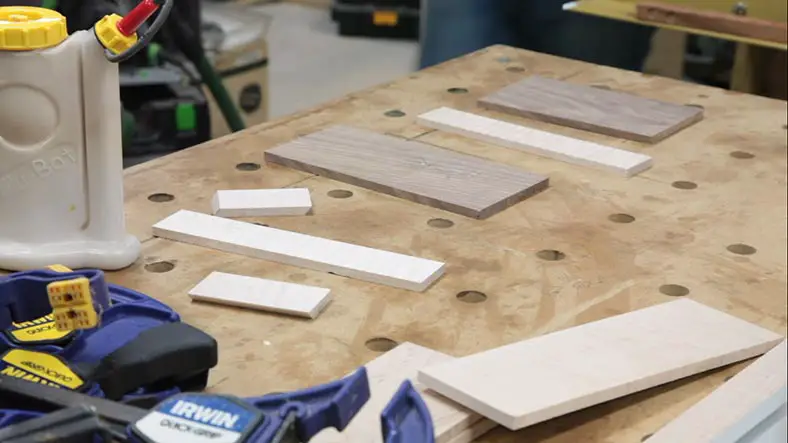
Fase 3: tagliare e rasare il legno a misura
A planer and a table saw will make the cutting and shaving process go a lot quicker and can ensure a more accurate shape, but you don’t need them to get things done. If you don’t have a planer or table saw available at home, you can always work with a good ol’ fashioned handsaw and sandpaper.
Now, it can be tricky to cut in a straight line when you’re using a handsaw, but it isn’t impossible. One skillful way you can do this is by allowing the handsaw to naturally pierce through the wood without too much force coming from your end. This is because using too much force makes your cuts more shaky and unstable. Remember, your handsaw is a sharp tool, so let it do the work for you.

Fase 4: Mettere insieme tutti i pezzi
Now that you’ve got all your pieces cut and ready, it’s time to assemble your dice tower!
Posizionate il lato posteriore del tubo su una superficie piana (il tavolo da lavoro o una scrivania). Prendete uno dei pezzi laterali e mettete un'abbondante quantità di colla per legno su un lato. Stendete la colla con le dita o con un pennello, quindi applicate tre piccole gocce di supercolla in modo uniforme sullo stesso lato per un maggiore sostegno. Una volta fatto, potete incollare il pezzo laterale alla base e usare i morsetti per tenere insieme i due pezzi.
Repeat the same thing on the other side and don’t forget to use both the wood glue and super glue to secure the piece into place.

After you’re done attaching both the left and right sides of the tube, you can start positioning your baffles. These pieces will be what guides your dice through the tube, so make sure they are evenly spaced so that your dice won’t get stuck in between any of them.
A questo punto, mettete da parte il tubo parzialmente completato e aspettate qualche minuto per lasciare che la colla si asciughi bene prima di procedere. Tornate con un scalpello e ritagliare le parti sovrapposte prima di fissare il lato anteriore del tubo.
Now all that’s left to assemble is your landing tray.
It’s not much different than constructing the dice tower tube — you’ll have to set the base of your landing tray on a flat surface for the first step, apply wood glue on one side of the first barrier, stick it onto the base, and secure the pieces using a clamp.

Potete ripetere la stessa cosa con i tre lati rimanenti.
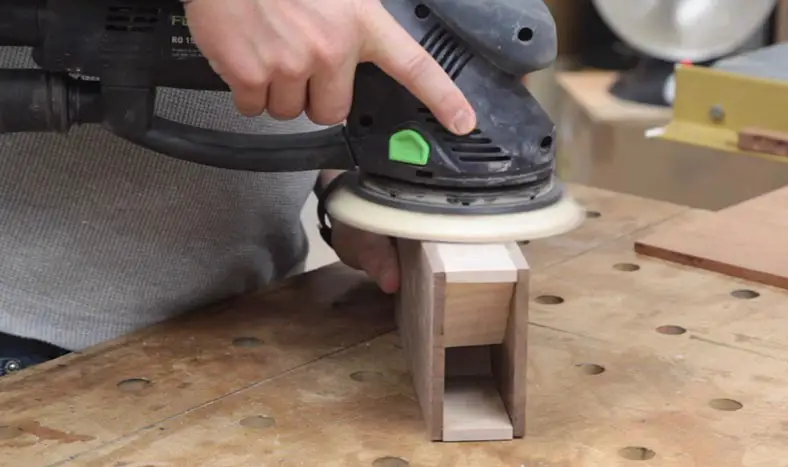

Fase 5: Pulizia della torre dei dadi
Una volta che entrambe le sezioni della torre dei dadi sono completamente asciutte, è possibile carteggiare ogni sezione per assicurarsi che le superfici siano lisce. Dopo, pulire con un asciugamano pulito per rimuovere la polvere dalla vostra nuovissima torre dei dadi fai da te!
Come realizzare una torre di dadi di cartone
If aren’t particularly fond of working with wood, I made a step-by-step tutorial for a simple cardboard dice tower you can try.

Fase 1: raccolta dei materiali
Just like what we did with the previous tutorial, you’re gonna want to gather your materials first. These are:
Strumenti:
- Forbici
- Pinze
- Pistola per colla a caldo
Materiali:
- 3 graffette piccole
- Cartone di ricambio
- Righello
- Penna
- Carta spessa
- Bastoncini di colla
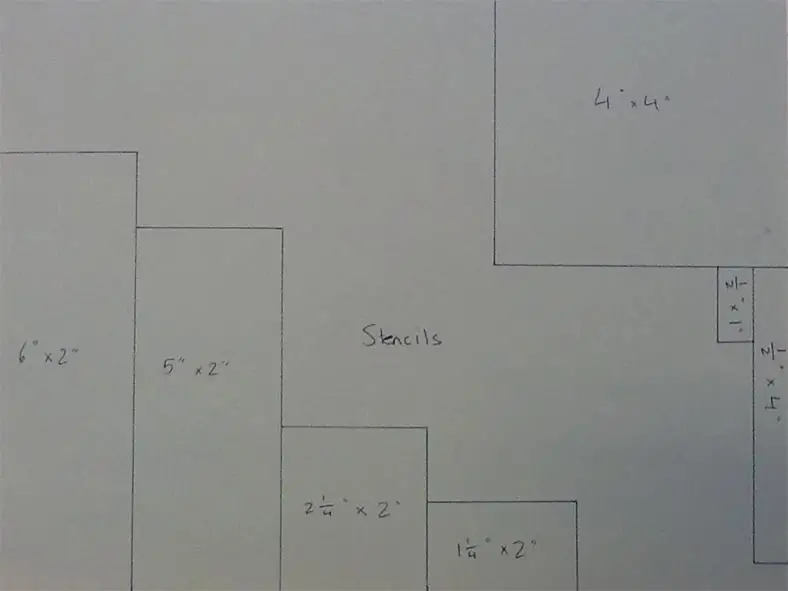

Fase 2: Creare gli stencil
Now, you’re going to make stencils for all the cardboard components that we’re going to use for making your dice tower. The reason we’re doing this is because most of the components we’re gonna be using are of the same size, and it just wouldn’t make sense if we had to measure one piece 3 times in a row!
Prendete la carta spessa, la penna e il righello e tracciate sulla carta le seguenti misure:
- 4″ x 4″
- 6″ x 2″
- 5″ x 2″
- 2 1/4″ x 2″
- 1 1/4″ x 2″
- 1/2″ x 4″
- 1/2″ x 1″
Once you’re done drawing them out, it’s time to cut them up with your scissors.


Fase 3: Realizzazione dei pezzi di cartone
Stendete il cartone su una superficie piana e iniziate a misurare i seguenti pezzi usando la penna e gli stampini:
- Un pezzo (4″ x 4″)
- Tre (6″ x 2″) pezzi
- Un pezzo (5″ x 2″)
- Un pezzo (2 1/4″ x 2″)
- Tre (1 1/4″ x 2″) pezzi
- Tre (1/2″ x 4″) pezzi
- Due (1/2″ x 1″) pezzi
Una volta fatto, ritagliateli tutti con le forbici.

Fase 4: supporto della piattaforma
In this next step, you’ll want to take out your pliers and use them to bend all the paperclips into straight lines. Snap each paperclip in half so you’ll be left with 6 short rods to use as your platform support. Bend each rod into a 65° angle.

Fase 5: Creazione della piattaforma
Prepare your three 1 ¼’’ x 2’ pieces of cardboard and lay them on a flat surface. Measure ¼ of an inch from the cardboard border towards the center using your ruler. Now, with your hot glue gun, glue each support to the cardboard piece using the lines that you drew as guides.

Ripetere l'operazione su tutti e tre i pezzi.

Fase 6: Posizione e fissaggio della piattaforma
Prendere il pezzo di cartone da 6″ x 2″ e posizionarlo accanto al righello in modo che la parte superiore del pezzo sia allineata con il segno 0. Segnare il punto 2 1/4″ e tracciare una linea retta.
Next, lay out your 5″‘ x 2″ cardboard piece and put it next to your ruler in the same way — the edge touching the 0 inch mark. Make two marks on this piece: one at the 1 inch point and another at the 3 ¾ inch point.
Tracciate una linea retta in corrispondenza di questi punti, che servirà a fissare le piattaforme.
Preparate le tre piattaforme realizzate e disponetele accanto ai due pezzi di cartone appena segnati. Prendete una piattaforma e, utilizzando il vostro pistola per colla a caldoIncollatela sopra la linea appena tracciata. Fate lo stesso con le altre piattaforme: dovreste avere una piattaforma sul pezzo da 6″ x 2″ e due piattaforme sul pezzo da 5″ x 2″.
Don’t glue anything else aside from the paperclip ends.

Fase 7: Assemblaggio della torre dei dadi
Take your glue gun and apply some glue to the first side of your 6” x 2” assembled wall. Attach this side to one of the other 6” x 2” pieces. Now, apply glue on the one side of the 5” x 2” assembled wall and attach it to the other side of the first assembled piece. Once that is done, take your 2 2 1/4″ x 2″ piece and attach the 1/4″ side on the bottom of the walls so it forms an angle.
Quindi, applicare la colla su entrambi i bordi della torre, ora parzialmente completata, e posizionare il restante pezzo da 6″ x 2″ sulla parte superiore.
Now, you’re almost done!
The last thing you’ll need to construct is your vassoio per dadi. So, lay out your 4” x 4” piece, apply a bit of glue on the edge then attach the 1/2″ x 4″ piece to the side. Repeat the same thing with the remaining pieces.
And you’re all done — congratulations!
6 piani di torri di dadi facili e veloci da provare
If you’re looking for a design with a little more character and spunk, we’ve created this list of 6 quick and easy dice tower plans that you can check out at any time.
1. La classica torre dei dadi
This design was specifically made for gamers who aren’t looking for something that’s too over-the-top. Although the plans are a bit basic, this tower does offer a couple of cool features, like full lining to improve noise reduction and a magnetic closure. To make this tower, you’ll need plywood, felt, a small magnet, a paper clip, a small hinge, string, glue (I still recommend using both wood glue and super glue), a pencil, and clamps.

2. Torre dei dadi a tema medievale
If themes are something that you like having a lot of fun with, this design is a great choice for you. The plans indicate a medieval theme, which is fitting since it’s, well, a tower, but you can play around as much as you want with this design. The materials you’ll need for this building project are a hot glue gun, razor blades, measuring tape, clamps, cardboard, paint, and zip ties.

3. Torre dei dadi dal design telescopico
Si tratta di uno dei progetti più avanzati e complessi, perfetto per chi è alla ricerca di una piccola sfida nella costruzione di torri di dadi.
It’s called a telescoping design because it offers a unique feature that isn’t often seen with dice towers: it can be collapsed into a smaller size — much like a telescope — which makes it much easier to take with you if you’re going somewhere else for game night. The tools and materials you’ll need for this project are simple: 2x MDF Sheets (400x600x3mm) and super glue.

4. Torre dei dadi trasparente
If you were into any arcade games in your childhood, this design will give you a good shot of nostalgia. This dice tower is designed to look like the age-old favorite “flipper,” and you can watch as your dice bounce off each baffle as it descends onto the landing tray.

The landing tray also serves as a nifty storage area for when you want to store your tower away after games or to bring it with you if you’re playing in other locations. For this design, you’ll be needing black cherry and hard maple hardwood, although you can use the design with basically any wood you prefer to use.
5. Torre dei dadi LEGO

If you’re looking for a fun way to combine your childhood joy of building with LEGO bricks with your more recent love of board games, why not try making dice towers for the games you like using (yup, you guessed it!) LEGO. It’s easy to make and you won’t need too many materials to complete it. You can use any color you like and make it into any size you want, plus you won’t have much trouble storing it as you can easily take it down and put it back up later on.
6. Torre dei dadi in legno di zebrano e ottone
If you haven’t guessed from the name already, the main materials used in this design are zebrawood and brass. This project is perfect for people who enjoy working with wood and brass, so I encourage you to have fun experimenting with this one. It’s a creative and innovative way of building a tower, so it’s a lot different from the other plans that I mentioned on this list.

Conclusione
Costruire la propria torre di dadi non è certo una passeggiata e acquistarne una su Amazon o su altri fornitori online sarebbe una scelta molto più semplice, anche se più costosa.
But before you click “Buy,” I encourage you to think about the things that you could be missing! Building a dice tower challenges your imagination and creativity. It’s a fun way to spend your free time, and it’s a great exercise of character.
Fidatevi di me: costruire una torre di dadi richiede molta pazienza e dedizione. Potete anche trasformarla in una divertente attività di aggregazione con gli amici o i membri della famiglia. Le possibilità sono infinite!
If you’ve gotten this far into the article, I’d like to offer you my thanks. I hope this guide has helped you and I hope you put what you learned from this article to good use. Find anything missing from this guide? Let me know in the comments section below.
Finally, if you have friends who are interested in building their own personalized dice towers, don’t forget to send them this step-by-step guide!
Divertitevi a costruire!