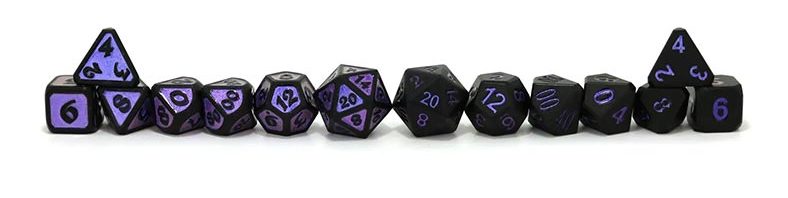
Playing board games is a great way to bond with family and friends. Whatever your hobbies and curiosities are, there’s bound to be a board game out there that will strike your interest! Now, most of the board games I’ve played often involve dice, and we all know how competitive these types of games can get. Lots of accusations flying around, sneaky players trying to control their rolls.
Alles wäre prima, wenn es nur etwas gäbe, was man tun könnte, um das Blutbad zu stoppen, bevor es passiert. Und zum Glück gibt es das.

A dice tower is a simple machine that can guarantee you and other players fair rolls at every turn. And while you can certainly buy one from any gaming store in the U.S., there’s just something more enjoyable and fun about designing a dice tower of your own!
So, that’s what I’ll be teaching you today in this step-by-step guide on how to make your own dice tower!
But before we get started with building, let’s go over some of the basics.
Inhaltsübersicht
What Is a Dice Tower and How Does it Work?
Not everyone uses a dice tower during a game. So, if you don’t already know what a dice tower is, let me explain.
During a game, there are several ways a player can cheat a roll. The most common way he can do it is by sliding or dropping his dice so that only his desired numbers appear, giving him an unfair advantage during the game. These are called “controlled throws.”
A dice tower is a mechanical device that makes it impossible for a player to control his throws. It typically has 2 sections: the vertical section (the tube) and the horizontal section (the landing tray).
The vertical section or “the tube” has an opening at the top where the dice is meant to be dropped into. Inside this section, baffles are installed to parry the dice, knocking them around as they fall. These baffles guarantee that players get different results after every roll.
At the very bottom of the vertical section, the last baffle pushes the dice out onto the horizontal section: the landing tray.
The landing tray, as its name suggests, is basically where the dice “lands” after they fall through the tube, and is where results are displayed for players to see. This section is flat and often constructed with high sides to prevent the dice from falling out.
Things to Consider Before Building a Dice Tower
Like all inventions, there are a couple of factors you have to consider to ensure that your dice tower is constructed correctly. These are:
- The number of dice you’re going to use (in other words, the overall size of your dice tower)
- Collapsibility or foldability
- The type of materials you want to use during your construction
1. Number of Dice
Most board games require the use of one or two dice at a time, so a standard-size dice tower will do you well in this scenario. But if you’re planning to play a game that needs players to use 3 or 4 dice for each throw, you’re going to need a much larger dice tower in-game. This is to ensure that all the dice fall and land consistently without getting stuck between baffles (which can be really annoying during a game).

2. Collapsibility or Foldability
The next thing you’ll want to think about is storage. Leaving your dice tower on a shelf or table or some random place in your house will make it accumulate dust, and that can be really tricky to clean later on. The normal static L-shaped dice towers you see online might not be the best choice if you’re looking for something that is easy to store and/or portable. To avoid this problem, make sure to choose a plan for a collapsible or foldable dice tower and assigning a designated storage area is essential.

3. Type of Materials
You can build dice towers out of basically any material from fiberglass to cardboard, but the most common ones you’ll see are often made of wood or foam board.
These two materials are great for dice towers for two main reasons:
- They’re both light-weight but durable materials
- They absorb vibration and can minimize the sound of the dice rolling around
Some dice towers use felt linings or pads for better noise reduction. And personally, I agree with this choice. Often, when playing long-duration board games, the noise that comes from the dropping dice can become unsettling and can easily break your focus.
For a better overall gaming experience, I recommend you use some sort of padding for your dice tower.
How to Make Dice Tower?
Now that we’ve covered pretty much everything there is to know about dice towers and what factors to consider before building one, we can now proceed to do what you came here to do: build your own dice tower.
Let’s jump right into it!
How to Make a Wooden Dice Tower
Wooden dice towers are sturdy and are great for people who enjoy playing around with tools.

Step 1: Gather your tools and materials
Let’s start by gathering all the tools and materials you need for constructing your dice tower.
These are:
Tools:
- Clamps
- Tape Measure
- Pencil
- Schleifpapier
- Chisel
- Handsaw
Optional tools:
- Planer
- Table saw
Materials:
- Good quality plywood of around 6-8 inches
- Wood glue
- Superkleber
Optional materials:
- Felt or any type of padding of your choice
Once you’ve gathered all your materials, you can move on to the next step.

Step 2: Getting the right dimensions
If you stuck by the considerations I listed in the previous section, then you probably already have a rough idea of how big or small you want your dice tower to be. However, if you skipped that section and have no idea what I’m talking about, then I suggest you go back and read it before you proceed.
Getting your dice tower dimensions right is possibly the most important part in this construction process because if you get this wrong, your dice tower won’t work the way it’s supposed to.
The standard size for dice towers is often 6.5 x 3 x 4, but you can make your own measurements based on your specific needs.
For the tube (the horizontal section), you’ll need to measure:
- One 5.5 x 4 piece of wood for the front side of the tube
- One 6.5 x 4 piece of wood for the back side of the tube
- Two 6.5 x 3 pieces of wood for the sides
- Three smaller pieces of wood to use for your baffles
For the landing tray (the horizontal section), you’ll need:
- One 4.5 – 5” wide piece of wood for your tray (the length you can adjust depending on your needs)
- Four smaller pieces of wood to use as the tray barriers
After you get your measurements down, it’s time to do some cutting.

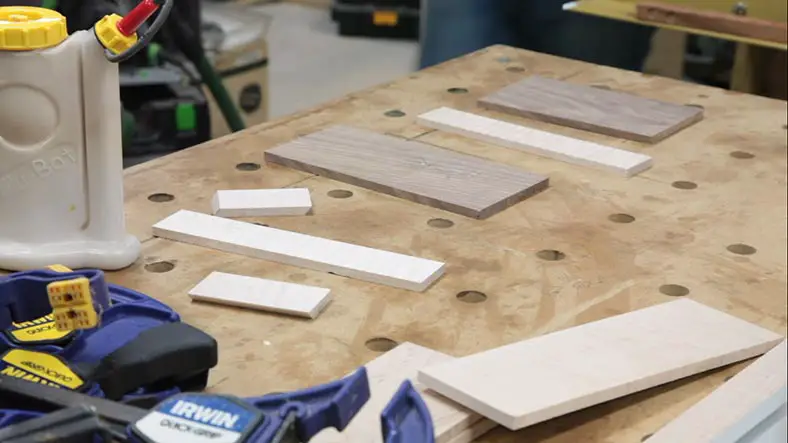
Step 3: Cutting and shaving your wood down to size
A planer and a table saw will make the cutting and shaving process go a lot quicker and can ensure a more accurate shape, but you don’t need them to get things done. If you don’t have a planer or table saw available at home, you can always work with a good ol’ fashioned handsaw and sandpaper.
Now, it can be tricky to cut in a straight line when you’re using a handsaw, but it isn’t impossible. One skillful way you can do this is by allowing the handsaw to naturally pierce through the wood without too much force coming from your end. This is because using too much force makes your cuts more shaky and unstable. Remember, your handsaw is a sharp tool, so let it do the work for you.

Step 4: Putting all the pieces together
Now that you’ve got all your pieces cut and ready, it’s time to assemble your dice tower!
Set the back side piece of the tube on a flat surface (either your work table or a desk). Take one of the side pieces and place an ample amount of wood glue on one side. Spread the glue using your finger or a brush, then apply three small drops of superglue evenly over the same side for extra support. Once done, you can stick the side piece to the base and use your clamps to keep the two pieces together.
Repeat the same thing on the other side and don’t forget to use both the wood glue and super glue to secure the piece into place.

After you’re done attaching both the left and right sides of the tube, you can start positioning your baffles. These pieces will be what guides your dice through the tube, so make sure they are evenly spaced so that your dice won’t get stuck in between any of them.
Now, set your partially completed tube aside and wait a few minutes to let the glue dry properly before proceeding. Come back with a chisel and carve out overlapping parts before attaching the front side of your tube.
Now all that’s left to assemble is your landing tray.
It’s not much different than constructing the dice tower tube — you’ll have to set the base of your landing tray on a flat surface for the first step, apply wood glue on one side of the first barrier, stick it onto the base, and secure the pieces using a clamp.

You can repeat the same thing with the remaining three sides.
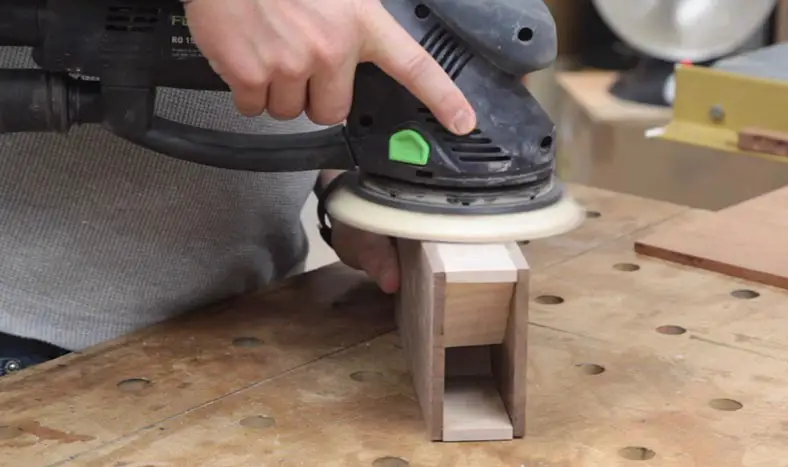

Step 5: Cleaning your dice tower
Once both sections of your dice tower are completely dry, you can sand down each section to make sure their surfaces are smooth. After, wipe it down with a clean towel to remove the dust from your brand-new DIY dice tower!
How to Make a Cardboard Dice Tower
If aren’t particularly fond of working with wood, I made a step-by-step tutorial for a simple cardboard dice tower you can try.

Step 1: Gathering your materials
Just like what we did with the previous tutorial, you’re gonna want to gather your materials first. These are:
Tools:
- Scissors
- Pliers
- Hot Glue Gun
Materials:
- 3 Small Paperclips
- Spare Cardboard
- Ruler
- Pen
- Thick Paper
- Glue Sticks
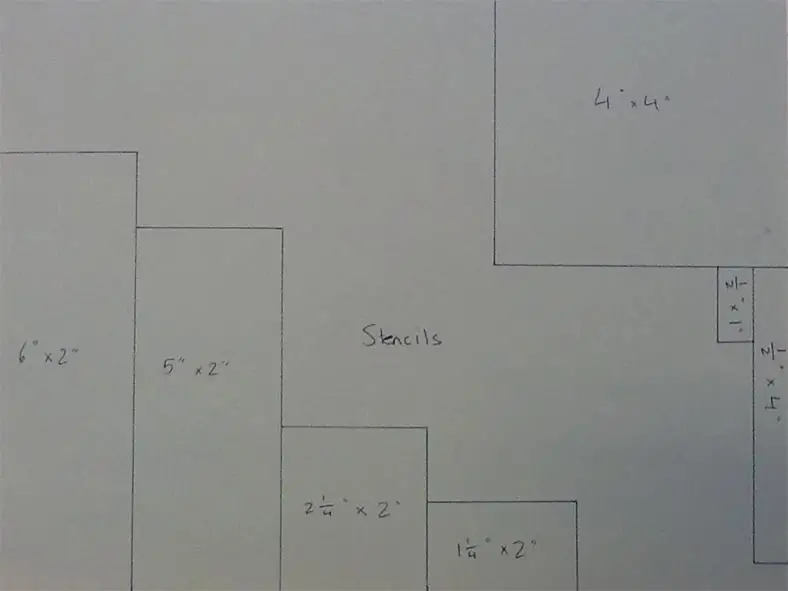

Step 2: Creating your stencils
Now, you’re going to make stencils for all the cardboard components that we’re going to use for making your dice tower. The reason we’re doing this is because most of the components we’re gonna be using are of the same size, and it just wouldn’t make sense if we had to measure one piece 3 times in a row!
Grab your thick paper, pen, and ruler. Now, draw out the following measurements on your paper:
- 4″ x 4″
- 6″ x 2″
- 5″ x 2″
- 2 1/4″ x 2″
- 1 1/4″ x 2″
- 1/2″ x 4″
- 1/2″ x 1″
Once you’re done drawing them out, it’s time to cut them up with your scissors.


Step 3: Making the cardboard pieces
Lay out your cardboard on a flat surface and start measuring the following pieces using your pen and stencils:
- One (4″ x 4″) piece
- Three (6″ x 2″) pieces
- One (5″ x 2″) piece
- One (2 1/4″ x 2″) piece
- Three (1 1/4″ x 2″) pieces
- Three (1/2″ x 4″) pieces
- Two (1/2″ x 1″) pieces
Once done, cut them all out with your scissors.

Step 4: Platform support
In this next step, you’ll want to take out your pliers and use them to bend all the paperclips into straight lines. Snap each paperclip in half so you’ll be left with 6 short rods to use as your platform support. Bend each rod into a 65° angle.

Step 5: Making your platform
Prepare your three 1 ¼’’ x 2’ pieces of cardboard and lay them on a flat surface. Measure ¼ of an inch from the cardboard border towards the center using your ruler. Now, with your hot glue gun, glue each support to the cardboard piece using the lines that you drew as guides.

Repeat this on all three pieces.

Step 6: Platform location and attachment
Take your 6″ x 2″ cardboard piece and place it next to your ruler so that the top of the piece is aligned with the 0 inch mark. Mark the 2 1/4″ point and make a straight line across.
Next, lay out your 5″‘ x 2″ cardboard piece and put it next to your ruler in the same way — the edge touching the 0 inch mark. Make two marks on this piece: one at the 1 inch point and another at the 3 ¾ inch point.
Draw a straight line at these points. This will be where you attach your platforms.
Prepare the three platforms you made and lay them beside the two cardboard pieces you just marked. Take one platform and, using your hot glue gun, glue it on top of the line you just drew. Do the same with the other platforms. You should have one platform on the 6″ x 2″ piece and two platforms on the 5″ x 2″ piece.
Don’t glue anything else aside from the paperclip ends.

Step 7: Assembling your dice tower
Take your glue gun and apply some glue to the first side of your 6” x 2” assembled wall. Attach this side to one of the other 6” x 2” pieces. Now, apply glue on the one side of the 5” x 2” assembled wall and attach it to the other side of the first assembled piece. Once that is done, take your 2 2 1/4″ x 2″ piece and attach the 1/4″ side on the bottom of the walls so it forms an angle.
Next, apply glue on both edges of your now partially completed tower then place the remaining 6″ x 2″ piece on top.
Now, you’re almost done!
The last thing you’ll need to construct is your dice tray. So, lay out your 4” x 4” piece, apply a bit of glue on the edge then attach the 1/2″ x 4″ piece to the side. Repeat the same thing with the remaining pieces.
And you’re all done — congratulations!
6 Quick and Easy Dice Tower Plans to Try Out
If you’re looking for a design with a little more character and spunk, we’ve created this list of 6 quick and easy dice tower plans that you can check out at any time.
1. The Classic Dice Tower
This design was specifically made for gamers who aren’t looking for something that’s too over-the-top. Although the plans are a bit basic, this tower does offer a couple of cool features, like full lining to improve noise reduction and a magnetic closure. To make this tower, you’ll need plywood, felt, a small magnet, a paper clip, a small hinge, string, glue (I still recommend using both wood glue and super glue), a pencil, and clamps.

2. Medieval Themed Dice Tower
If themes are something that you like having a lot of fun with, this design is a great choice for you. The plans indicate a medieval theme, which is fitting since it’s, well, a tower, but you can play around as much as you want with this design. The materials you’ll need for this building project are a hot glue gun, razor blades, measuring tape, clamps, cardboard, paint, and zip ties.

3. Telescoping Design Dice Tower
This is one of the more advanced, complex designs that are perfect for people who are looking for a little challenge when it comes to dice tower construction.
It’s called a telescoping design because it offers a unique feature that isn’t often seen with dice towers: it can be collapsed into a smaller size — much like a telescope — which makes it much easier to take with you if you’re going somewhere else for game night. The tools and materials you’ll need for this project are simple: 2x MDF Sheets (400x600x3mm) and super glue.

4. See-Through Dice Tower
If you were into any arcade games in your childhood, this design will give you a good shot of nostalgia. This dice tower is designed to look like the age-old favorite “pinball,” and you can watch as your dice bounce off each baffle as it descends onto the landing tray.

The landing tray also serves as a nifty storage area for when you want to store your tower away after games or to bring it with you if you’re playing in other locations. For this design, you’ll be needing black cherry and hard maple hardwood, although you can use the design with basically any wood you prefer to use.
5. LEGO Dice Tower

If you’re looking for a fun way to combine your childhood joy of building with LEGO bricks with your more recent love of board games, why not try making dice towers for the games you like using (yup, you guessed it!) LEGO. It’s easy to make and you won’t need too many materials to complete it. You can use any color you like and make it into any size you want, plus you won’t have much trouble storing it as you can easily take it down and put it back up later on.
6. Zebrawood and Brass Dice Tower
If you haven’t guessed from the name already, the main materials used in this design are zebrawood and brass. This project is perfect for people who enjoy working with wood and brass, so I encourage you to have fun experimenting with this one. It’s a creative and innovative way of building a tower, so it’s a lot different from the other plans that I mentioned on this list.

Schlussfolgerung
Building your own dice tower is certainly no walk in the park and buying one of Amazon or some other online supplier would be a much easier choice, albeit more expensive.
But before you click “Buy,” I encourage you to think about the things that you could be missing! Building a dice tower challenges your imagination and creativity. It’s a fun way to spend your free time, and it’s a great exercise of character.
Trust me. Building a dice tower takes tons of patience and dedication. You can even turn it into a fun bonding activity with friends or family members. The possibilities are endless!
If you’ve gotten this far into the article, I’d like to offer you my thanks. I hope this guide has helped you and I hope you put what you learned from this article to good use. Find anything missing from this guide? Let me know in the comments section below.
Finally, if you have friends who are interested in building their own personalized dice towers, don’t forget to send them this step-by-step guide!
Have an awesome time building!